Updating Transceiver firmware
This section discusses the procedure required to update the Crimson TNG and Cyan transceiver firmware. Broadly speaking, Crimson TNG and Cyan has three primary firmware sources: the FPGA firmware, the Linux firmware, and the MCU firmware (the Atmel processor code used to control and configure the radio and time boards)
Note
Additional documentation exists for the architecture behind Crimson TNG and Cyan.
The following section explains the procedure to run an update package on Crimson and Cyan SDRs.
1. Using Update packages
Update packages include all software components required to update a Per Vices SDR product, including MCU binaries, firmware applications, and FPGA code.
2. Automatic Update (Recommended)
2.1. Pre-requisites
In order to automatically update from Crimson TNG, you require;
- Update package
- For crimson these are available from a github repo
- For cyan please contact Per Vices
- A client terminal with SSH and SCP installed.
2.2. Update Procedure
Overview
Unless otherwise instructed, you should follow the automatic update instructions to help ensure a smooth update process.
Here is an overview of what this process entails:
- Download the update package.
- Copy the update package to Crimson TNG or Cyan.
- Execute the update script and wait for it to be completed.
- (For Crimson TNG Users) Regenerate the look up table (Optional).
- (For Cyan Users) Reboot the device
- Update to the corresponding UHD version.
Downloading an update package for Crimson
You can use git to clone the latest releases repo as follows:
$ git clone https://github.com/pervices/releases.gitgit checkout master and git pull to ensure you have the latest updates.
Warning
For older Crimson or Cyan SDRs, you must ensure that you are using the correct branch for your particular hardware revision. Failure to do so may cause the product to malfunction. If you have a product that is several years old, it may be best to contact us. to ensure you have the correct release.
Find the update package for your unit revision in the top directory of the releases repo. If you are unsure of the RTM number for your unit please contact us.
| Revision | Update Package Name |
|---|---|
| RTM 4 | updateCrimsonRtm4 |
| RTM 5 | updateCrimsonRtm5 |
| RTM 6 or 7 | updateCrimsonRtm6 |
| RTM 8 | updateCrimsonRtm8 |
| RTM 9 | updateCrimsonRtm9 |
Downloading an update package for Cyan
Per Vices will provide a URL link to the update package. You can download the update package using a web browser, or directly from the linux command line into your current directory using wget:
$ wget <support.pervices.com/url-address>Copying the release package to the SDR
You may use SCP to copy the appropriate release to Crimson or Cyan. Assuming the default Crimson TNG or Cyan IP address of 192.168.10.2, and after selecting the appropriate packages;
Crimson TNG or Cyan users:
$ scp <release_package_file> dev0@192.168.10.2:You will be prompted for a password, which is the same as the one you were previously provided with.
Executing the update script
Warning
Do not interrupt Crimson TNG or Cyan during the update process. The update process takes some time. It is very important NOT to interupt this process.
To execute the update process, you will need to SSH into Crimson TNG or Cyan, fix the package permissions, and execute the update binary from within a root shell. To do this, type the following commands in sequence;
ssh dev0@192.168.10.2
sudo -i # allows you run the update with root permissions
cd /home/dev0/ # navigate to the directory of the update package
chmod a+x ./<release_package_file> # Ensures the update package has execute permissions
./<release_package_file>
Note
For Crimson, if you are only using the low band stage, or would otherwise like to skip the lengthly Look Up Table (LUT) generation process, you may append the “nolut” arguement to the update command.
# For Example
./updateCrimsonRtm9 nolut
After the SDCard image and FPGA image have been updated, and the server has come up again, (which can take up to 10 minutes), you should see something similar to the the following output, but with version numbers that reflect your release;
Checking Version
RX 1f33a442
TX 1f33a442
SYNTH 1f33a442
FRIMWARE 4acd189d
FS-METAPV c64b534d25b6907292cd1bd2693b21fecbba6339
WEBPV 1aa775024abdff7481f973279959baa787b4f461
FPGA 9a10c7830
\=\=\=\=\=\=\=\=\=
VERSION GOOD
\=\=\=\=\=\=\=\=\=
Note
If the versions are not updated, you will get an alert indicating VERSION MISMATCH along with the specific component that is mismatched. This indicates that something went wrong during the update process. If this occurs, you’ll need to rerun the update program to address this issue, or else contact us for support: the product may not work consistently if it is partially updated, and this could result in very unusual problems or incorrect and undesired operation.
For Crimson TNG users, the unit will now automatically start to re-generating the look up table.
Note
If you are only using the baseband (low frequency) chain, the update process should now be complete, and you may now reboot the Crimson unit;
FOR CYAN ONLY: Reboot device
For the update to take effect on cyan, you will need to reboot the device.
For crimson, the update will take when the update package finishes running and rebooting the SDR is not necessary.
FOR CRIMSON TNG ONLY: Regenerating the lookup table
Note
This section is for Crimson TNG users only.
By default, after running the update utility, a look up table is re-generated.
The Look Up Table (LUT) generation process optimizes the high frequency chain of your particular Crimson unit and is unique to your specific Rx and Tx boards and radio chains.
Note
For crimson DO NOT power off or reboot unit the LED stops flashing to indicate that the LUT has finished generation. Powering the unit off will prevent the calibtation data from being saved.
The process to manually force the regeneration of the Look Up Table follows;
-
SSH into the Crimson unit, using the dev0 user and the password provided by Per Vices.
-
sudo to a root shell:
$ sudo -s - Delete the calibration data:
$ rm -rf /var/calibration-data/ - Regenerate the calibration data by enabling the lookup table (LUT)
$ echo 1 | sudo tee /var/volatile/crimson/state/{t,r}x/{a,b,c,d}/rf/freq/lut_en
Note
During the LUT generation processs, you will not be able to use Crimson.
Note
It will take approximately 30-45 min to fully complete this process.
The process is complete when the bottom LED on the crimson unit stops flashing.
While logged on to the Crimson unit, you may observe the current LUT generation process status by typing;
sudo systemctl status crimson-serverThe log results will indicate the radio chain, frequency and offset you will need, and are automatically used in the calibration tables.
Updating the corresponding UHD version
After updating your Crimson TNG or Cyan SDR unit, you should update to an appropriate version of UHD. Speaking broadly, if you compiled from master, then you should use the master UHD branch. If you compiled from a release branch, you should use the corresponding branch, unless otherwise specified.
To identify the correct version of UHD, select the branch or release that shares the same release tag as the one you selected when updating Crimson TNG or Cyan.
You can always determine what UHD version you have installed, by typing;
$ uhd_usrp_probe --versionInstructions on how to compile UHD from source can be found here.
3. Manual MCU Update
If the automatic update doesn’t work for you, there are other options. Contact us for more help on these matters.
4. FPGA Firmware
The FPGA firmware used by Crimson TNG is stored on the provided Crimson TNG SD card and is loaded onto the FPGA during boot. This procedure describes how to replace or update the FPGA code stored on the SD card.
It is also possible to update the FPGA firmware using the command line, or directly over JTAG using a USB Blaster.
Note
Updating firmware using the USB Blaster is not recommended if you are also using the SoC, as it may adversely impact SoC operation.
5. Crimson FPGA Update
Note
This section is for Crimson TNG users only.
5.1. FPGA Update Pre-requisites
You require the following items prior to updating the FPGA firmware stored on the FPGA firmware:
- FPGA Binaries (soc_system.rbf)
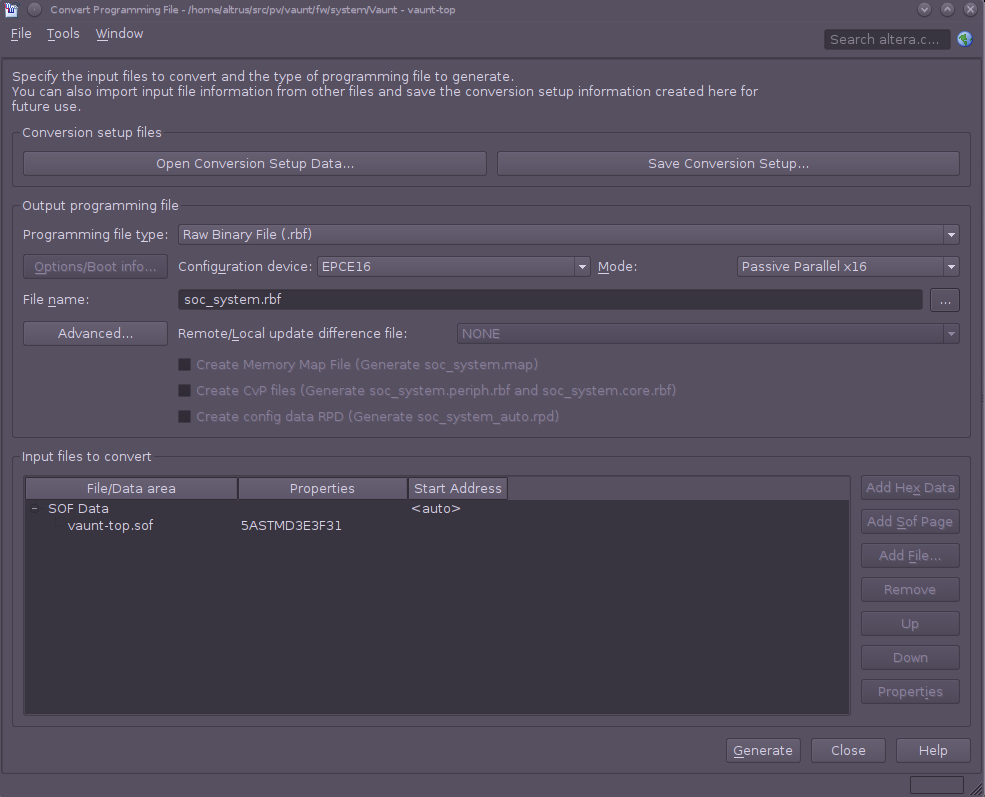
- This contains the FPGA firmware as a raw binary file (rbf) named soc_system.rbf. If you are compiling from source, or from within Quartus 2, you will have to convert the default output file (with an .sof extension - SRAM object file) to an appropriate RBF file. To do this, you must first compile the project. After compiling the project, open the Convert Programmer menu (File » Convert Programming Files) and use the settings.
- Crimson TNG SD Card
- The SD Card shipped with your Crimson TNG platform.
- Mini SD Card Reader
- All Crimson TNG transceivers ship with a USB card reader.
- Alternatively, you may use your own.
- A computer to copy over the SD Card.
- In order to copy over the SD Card, you will need a computer to copy the updated or generated FPGA firmware to the SD Card.
Figure 9.2: Quartus 2 IDE Convert Programming Files GUI.
The settings illustrate the conversion of the default (.sof) file format to the desired raw binary file (.rbf), with a mode of Passive Parallel x16, and an output filename of soc_system.rbf.
5.2. FPGA Update Procedure
-
If you are generating from your own Quartus Project, ensure that you have converted the newly generated source code to a Raw Binary File.
-
Confirm the file name is:
soc_system.rbf
-
Power down Crimson TNG, and remove the mini SD Card.
-
Insert the SD Card into the provided USB mini-SD Card reader, and insert the assembly into a computer.
-
Identify the partition containing the existing
soc_system.rbffile. The SD Card contains three partitions. Depending on your operating system, the number of viewable partitions may vary. Using a reasonable operating system, you should be able to view three partitions. For example:sdX1 - partition 1- type b - W95 FAT32 partition (This contains the RBF file!) sdX2 - partition 2 - type 83 - Linux ext3 partition (Contains SoC file system) sdX2 - partition 3 - type a3 - UBOOT and boot loader (It's best not to touch this) -
Once you identify the correct partition, replace the existing RBF file with the new one, and cleanly unmount the partition.
Note
You must ensure you cleanly unmount the partition. You risk corrupting the firmware image (and possibly even Crimson TNG) if you simply remove the USB key without first unmounting (safely removing) the USB key! For added security, type sync to flush file system buffers prior to removing the SDCard.
-
Remove the USB mini-SD Card adapter from your computer and pull out the mini-SD Card. Insert the bare SD card back into the Crimson TNG mini-SD Card receptacle.
-
Congratulations! You should have successfully updated the Crimson TNG FPGA code.