How to physically setup your Per Vices SDR product
See Figure 1 and Figure 2 for how the unit should look before and after.
Note
Information on how to configure your network can be found here.
1.1. Ensure Power is Properly Connected
The first step in using the Crimson TNG unit is to attach the power cable that came with the unit. Following the successful attachment of the power cable, you should now be able to turn the unit on with the front switch, see lights on the front panel illuminate green, and hear cooling fans running.
1.2. Ensure Management Port is Properly Connected
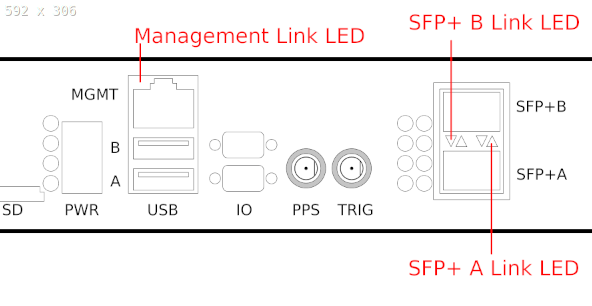
Next, we will set up the management (MGMT) port. To do this, plug in an ethernet cable from your host computer to the unit’s MGMT port. You should see four green lights on the front panel turn on sequentially, as well as on the back of the network interface card (NIC) on your host computer.
1.3. Ensure SFP+ A and SFP+ B Ports are Properly Connected
Lastly, we will need to attach the SFP+ A and SFP+ B ports from the host computer to the unit. Again, if your unit is properly connected on both ends, there should be an orange light glowing on the SFP+ ports on the front of the Crimson TNG unit.
Figure 1: Unit without any connections

Figure 2: Unit with necessary connections and visible lights
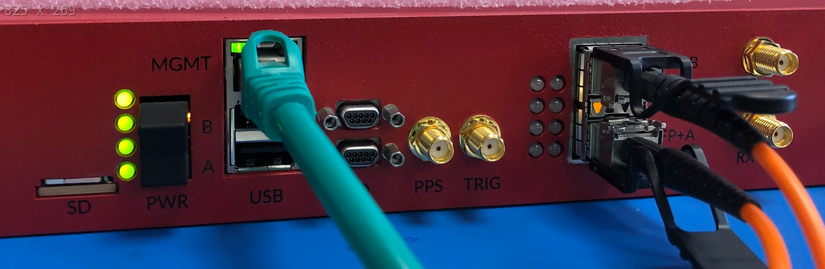
You can now proceed with powering on your SDR device and follow the steps linked to in the note below.
Note
How to ensure the successful set up and operation of your device can be found here.
Before doing any loop back tests, be sure to insert sufficient attentuation to avoid damaging the device.
Caution
| When connecting the Tx port to the Rx port, you MUST use an inline SMA attenuator with 30dB attenuation to ensure safe operation of the Crimson TNG device. |