Network Configuration How To Guide
The purpose of this how-to guide is to configure the network your Per Vices Crimson TNG or Cyan SDR device is on. Your SDR device boasts several network ports: the management (MGMT) port(s) is used to configure the device, and the SPF+ ports are used to send data. The operating system used in configuring the device used here is Arch Linux. We will cover the following:
- Part 1: Identifying the Network Interfaces
- Part 2: Configure Interfaces
- Part 3: Confirm Routing Table Configuration
- Part 4: Configuring Firewalls
- Part 5: Testing the Configuration
- Part 6: Making the Configuration Persistent
- Part 7: Troubleshooting
For a visual guide of the overall configuration procedure, see figure shown below:
Figure 1: Overall Network Port Configuration Procedure

Note
If you would like to configure a custom Crimson TNG or Cyan MGMT IP address using how to configure a custom management IP address, you will need to reflect these changes when following this network configuration how to guide.
Part 1: Identifying the Network Interfaces
The first part of this how-to guide is to identify that your host system’s network interfaces map to the physical ports (MGMT, Data SFP+ ports) on your Per Vices SDR transceiver (Crimson TNG, Cyan, custom). The following is how to ensure that the MGMT and SFP+ physical ports are correctly identified by your host systems network interface card (NIC). Two methods to do this are shown below.
1.1. Visual Identification by Blinking
The first method is to use software called ethtool. However, your NIC may not be supported by this, and you will have to use the steps in 1.2.
Note
You will need to download and install ethtool. You should be able to install ethtool using your distribution specific package manager.
Note
In case you ever unplug the unit, you may want to write down the information obtained using the below procedure on a piece of tape, and stick it to the host system so you always know which interface maps to which port on the Crimson TNG or Cyan device.
You will first need to identify all the interfaces on your host system. This can be accomplished using the following command in a Linux console:
$ ip link showNext, you can check which interface from the host system corresponds to what physical port using ethtool. Use the following command to do this:
$ sudo ethtool -p <interface> 120The interface which you specified should now blink on your host system for 2 minutes. Once you have identified this physical interface, you can connect the ethernet cable from it to the desired port on your Per Vices SDR, and make note of interface name.
1.2. Visual Identification by LED
The second method is to use trial and error to ensure the correct network interfaces are identified. The following steps should be taken to ensure this:
-
Power on your Crimson TNG
-
Wait for the unit to fully boot (all LEDS are solid green)
-
For each management and data cable, do the following steps in sequence, in order to uniquely identify the cable you have attached from the host system to the desired port:
a. Identify all the interfaces and test via interfaces:
You will first need to identify all the interfaces on your host system. This can be accomplished using the following command in a Linux console:
$ ip link showEach interface will be prefixed by “en” after running the above command.
Type the following command:
$ sudo ip link set up <interface>b. Wait 10 seconds
c. See whether the LED is turned on your host systems NIC
d. Then, type the following command:
$ sudo ip link set down <interface>e. See whether the LED is turned off on the host system NICs
f. If the LED turns on and off when you enable/disable (up/down) the interface, then you have correctly located the interface.
-
Move onto the next interface, beginning from 3.
1.3 FOR CRIMSON ONLY: Verify MGMT interface supports Half-Duplex Mode
The Crimson Management port must be connected to a network interface that supports Half-Duplex Mode.
Note
You will need to download and install ethtool. You should be able to install ethtool using your distribution specific package manager.
Once you have identified the interfaces as described above, check the interface that you plan to connect to Crimson MGMT port using the command:
ethtool <interface>[user@host ~]$ ethtool enp68s0
Settings for enp68s0:
Supported ports: [ TP ]
Supported link modes: 10baseT/Half 10baseT/Full
100baseT/Half 100baseT/Full
1000baseT/FullHere is an example of the beginning of the output for a network interface named enp69s0 that does NOT support Half-Duplex Mode:
[user@host ~]$ ethtool enp69s0
Settings for enp69s0:
        Supported ports: [ TP ]
        Supported link modes:   100baseT/Full
                                1000baseT/Full
                                2500baseT/Full
                                5000baseT/Full
Part 2: Configure Interfaces
2.1. Adding an IP Address, Subnet Mask and Broadcast Address
You are able to add an IP address, subnet mask and broadcast address to an interface on your host system using the following commands:
$ sudo ip address add <IP_address/prefix_len> broadcast + dev <interface>where the + is a special symbol that derives the broadcast address from the IP address and the subnet mask automatically.
2.2 Crimson TNG Default Network Configuration Example
The default IP addresses of the ports on the Crimson TNG device can be found in Table 1. The suggested host interface specifications for Crimson TNG are located in Table 2.
The recommended defaults would then be implemented using the following commands;
$ sudo ip address add 192.168.10.10/24 broadcast + dev <iface_management>
$ sudo ip address add 10.10.10.10/24 broadcast + dev <iface_sfpA>
$ sudo ip address add 10.10.11.10/24 broadcast + dev <iface_sfpB>
2.3 Cyan and Chestnut Default Network Configuration Example
The default IP addresses of the ports on the Cyan unit can be found in Table 1. The suggested host interface specifications for Cyan are located in Table 2.
The recommended defaults would then be implemented using the following commands;
$ sudo ip address add 192.168.10.10/24 broadcast + dev <iface_management>
$ sudo ip address add 10.10.10.10/24 broadcast + dev <iface_qsfpA>
$ sudo ip address add 10.10.11.10/24 broadcast + dev <iface_qsfpB>
$ sudo ip address add 10.10.12.10/24 broadcast + dev <iface_qsfpC>
$ sudo ip address add 10.10.13.10/24 broadcast + dev <iface_qsfpD>
2.4. Configuring the Correct MTU
Next, set the maximum transmission unit (MTU). This is an important step; without properly setting the MTU, transmission will not work properly. Use the following command to do so:
$ sudo ip link set mtu 9000 dev <SFP+ Interface>2.5 Example Setting MTU for Crimson
On Crimson, you would set the MTU for the two SFP+ interfaces as follows;
$ sudo ip link set mtu 9000 dev <SFP+ A Interface>
$ sudo ip link set mtu 9000 dev <SFP+ B Interface>
2.6 Example Setting MTU for Cyan and Chestnut
On Crimson, you would set the MTU for the four qSFP+ interfaces as follows;
$ sudo ip link set mtu 9000 dev <qSFP+ A Interface>
$ sudo ip link set mtu 9000 dev <qSFP+ B Interface>
$ sudo ip link set mtu 9000 dev <qSFP+ C Interface>
$ sudo ip link set mtu 9000 dev <qSFP+ D Interface>
2.7 Ubuntu Network Settings Configuration
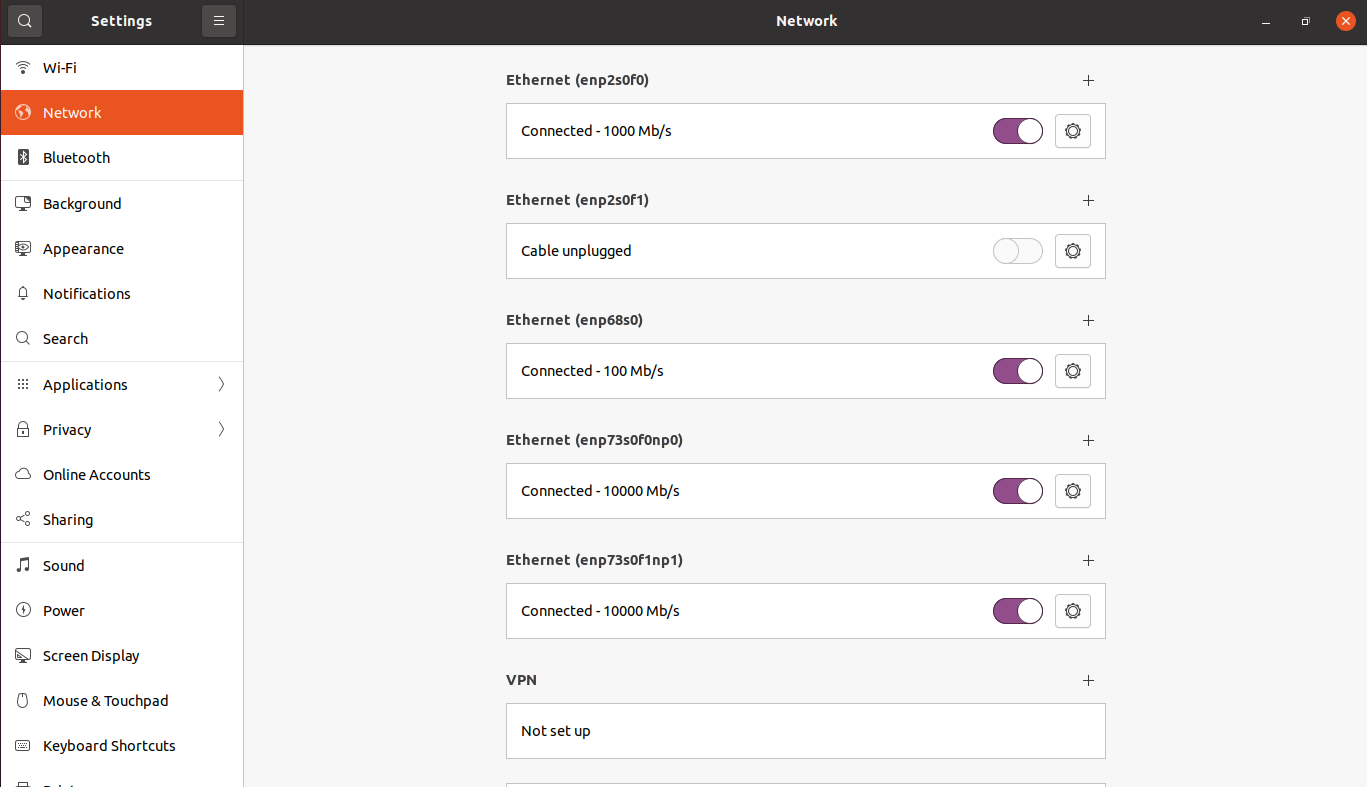
Alternatively, for Ubuntu users, this can also be accomplished with the GUI by going into network settings, as shown in Figure 2 below:
Figure 2: Ubuntu Network Settings.
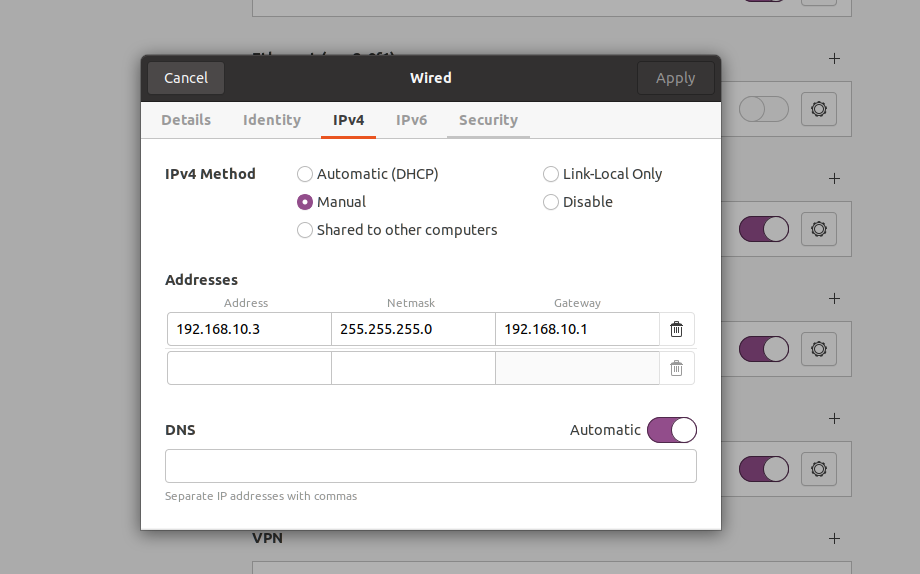
From there, you can click on the desired Ethernet port you intend to configure, and then put the correct Address, Netmask and Gateway values, as shown in Figure 3 below:
Figure 3: Configuring Ubuntu Network for Crimson TNG.
2.8. Further Reading
More information for network configuration with Arch Linux is found on this wiki page. More information for network configuration with Ubuntu is found on this wiki page.
Part 3: Confirm Routing Table Configuration
3.1. Confirming Routing Table
We will now confirm that the IP addresses have the correct genmask and are mapped to the correct interface on your host machine. We also will see that the genmask and interface all align to default values in Table 1 for Crimson TNG or Table 1 for Cyan. Run the following command to confirm this:
$ sudo routeThe figure below is similar to what you should see in your terminal when running the above command.
Figure 2: Routing Table

Using the example in 2.1., what we are looking for on the table is that there exists a default destination and gateway, and that the IP Destination is appropriate for the management and data IP addresses, that the Genmask is 255.255.255.0 and that the Iface matches the network adapter specificied. You will need to ensure this for all the MGMT and SFP+ ports/cables coming from the unit.
3.2. Further Reading
More information on this can be found in the following Arch Linux wiki page.
Part 4: Configuring Firewall (Optional)
If a firewall is active, you will need to configure it to allow the ports specificied in Table 1 for Crimson TNG, or the ports specified for Cyan in Table 1.
Part 5: Testing the Configuration
To ensure all the above changes were made correctly, you can ping test the MGMT and SFP+ ports, as shown here: ping test.
Part 6: Making the Configuration Persistent
To make the configuration persistent such that the configuration of the IP address of your host system’s NIC and Per Vices SDR device remains after rebooting, you will need to follow distribution specific instructions.
For instructions specific to Arch Linux, you can read more on their appropriate wiki for the Arch Linux network manager.
Part 7. Troubleshooting
If you made a mistake in configuring the IP addresses of the MGMT and/or SFP+ data ports connected to the SDR, and you want to start again, you can flush all IP addresses associated with an interface using the following command:
$ sudo ip address flush dev <interface>